


How to Fix a Dripping Tap: A Step-by-Step Guide

Updated: Aug 15
It is 2 AM in Dartford, and that rhythmic "plink-plink-plink" is echoing through your home like a drum kit. You have likely tried tightening the handle until your knuckles turn white, yet the water bill continues to climb whilst your patience wears thin. It is incredibly frustrating to feel like a minor leak is holding your peace of mind hostage, especially when you are worried that a DIY attempt might lead to a flooded kitchen. We understand that a small drip can feel like a major crisis.
This guide will show you exactly how to fix a dripping tap without the stress, helping you regain your quiet nights and save money on call-out fees. We are a trusted plumbing & heating company providing reliable, high-quality services across London and Kent, supporting postcodes like DA1, SE1, and BR1 since 1996. You will learn how to distinguish between traditional washers and modern ceramic discs, the essential tools required, and the precise steps to achieve a permanent, silent result. Whether you are in Dartford or South East London, these professional insights will give you the confidence to tackle the repair yourself.
Table of Contents
Why Your Tap is Dripping: Understanding the Cost and Causes
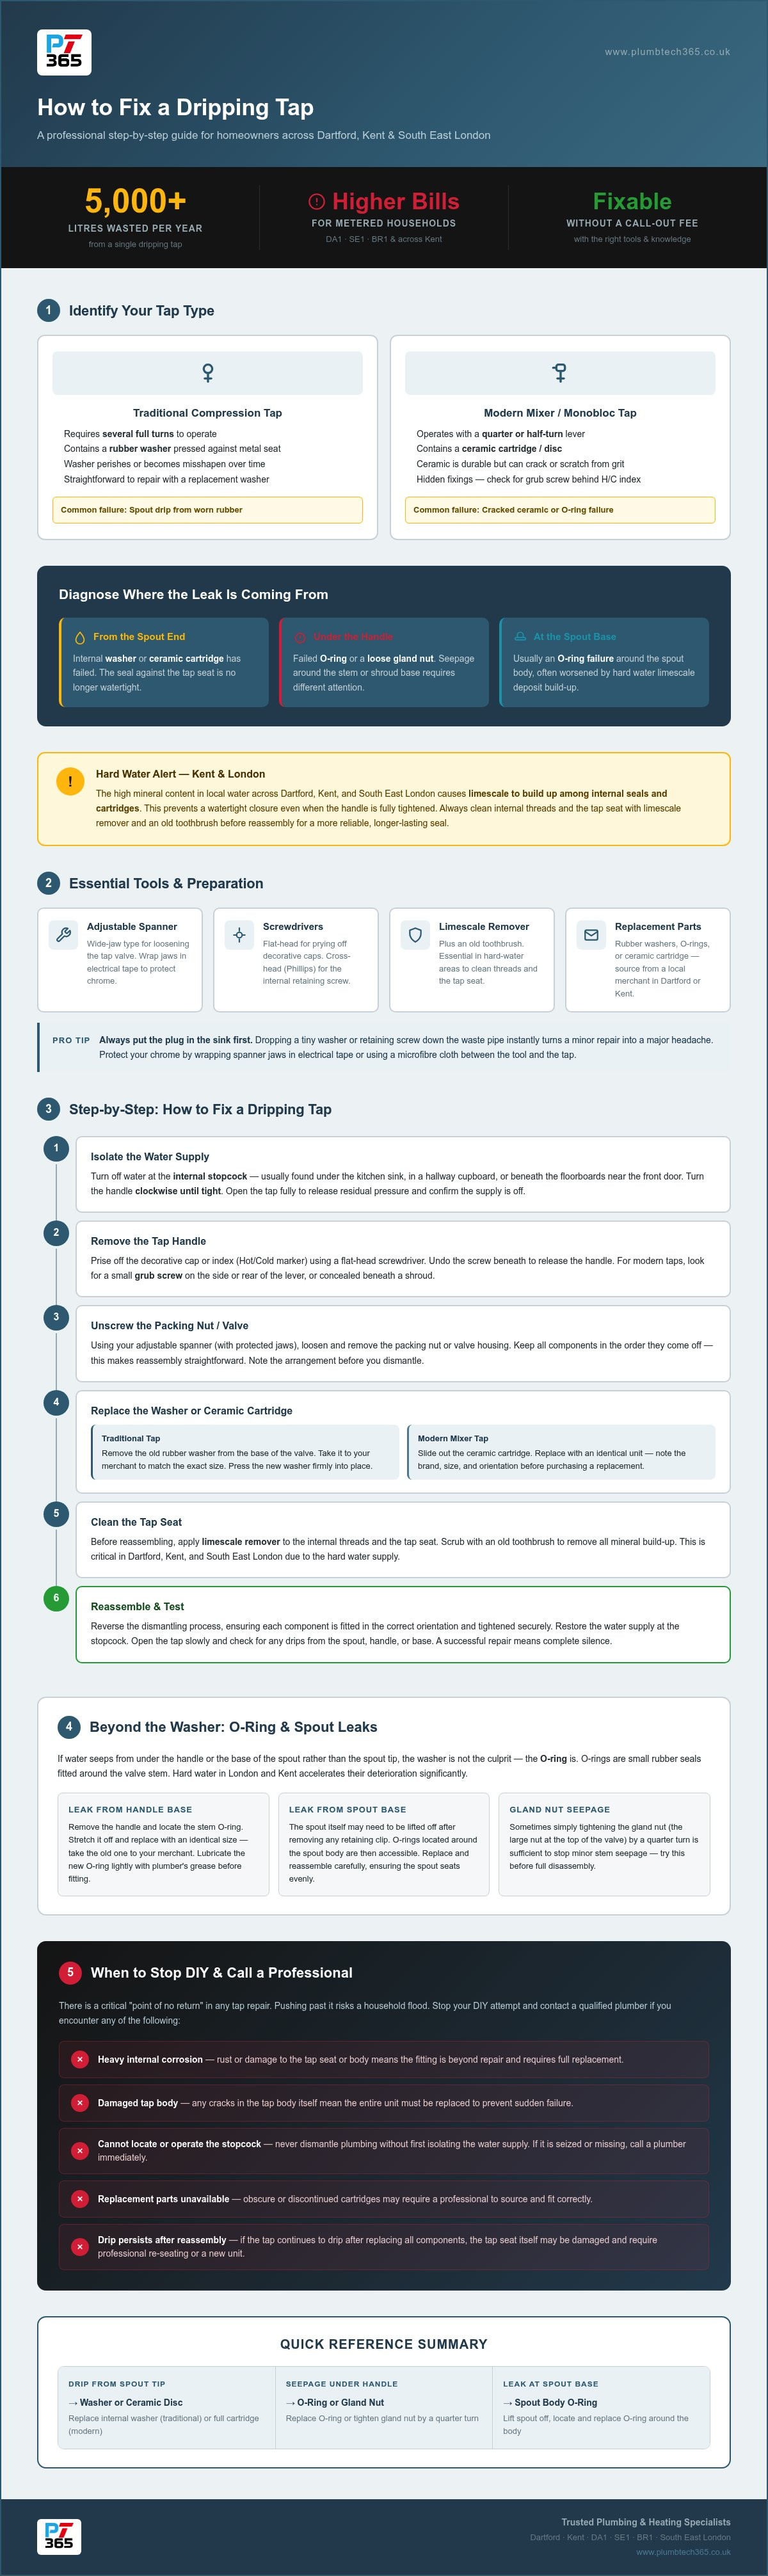
A dripping tap is rarely just a minor annoyance; it's a clear sign of internal component fatigue. Whilst the rhythmic sound might keep you awake, the environmental and financial costs are far more significant than most homeowners realise. According to industry data, a single dripping tap can waste over 5,000 litres of water annually. For residents in Dartford or South East London who are on water meters, this waste translates directly into higher monthly bills. Before learning how to fix a dripping tap, you must first diagnose the specific failure. If water is leaking from the end of the spout, the issue usually lies with the internal washer or ceramic cartridge. However, if water is seeping from under the handle or the base of the spout, it usually suggests a failed O-ring or a loose gland nut.
Common Causes of Tap Leaks
Most leaks are caused by the natural wear and tear of internal seals. In traditional compression taps, a rubber washer is pressed against a metal seat to stop the flow; over time, this rubber perishes or becomes misshapen. Modern mixer taps use ceramic discs that are incredibly durable but can still fail if they become cracked or scratched by grit. Limescale is a particular problem across Kent and London due to the high mineral content in the local water supply. These mineral deposits build up amongst the internal seals and cartridges, preventing a watertight closure even when the handle is turned off tightly. Addressing these issues early prevents further damage to the tap seat and avoids the need for a full new tap installation.
Identifying Your Tap Type
Identifying your hardware is the first step in any successful repair. Traditional taps usually require several full turns to switch the water on or off and typically contain rubber washers. Modern monobloc or mixer taps often feature a lever or a handle that only requires a quarter or half-turn to reach full flow. These versions contain ceramic cartridges rather than simple washers. Many designer fixtures in modern London properties have hidden fixings. You may need to look for a small grub screw tucked behind the decorative "H" or "C" indices, or beneath a shroud, to access the internal components. If you find the internal mechanisms are heavily corroded or the tap body is damaged, seeking professional plumbing repairs is the safest way to ensure a permanent fix without risking a household flood.
Essential Tools and Preparation for a Successful Repair
Preparation is the defining factor between a quick, successful fix and a stressful afternoon spent chasing small parts across the floor. Before you begin learning how to fix a dripping tap, you must secure your workspace. The most important step is often the simplest: put the plug in the sink. Dropping a tiny decorative screw or a vital washer down the waste pipe instantly turns a minor repair into a major headache. Once the drain is protected, you can focus on protecting your fixtures. Professional tradespeople use a simple trick to keep chrome looking pristine. Wrap the jaws of your adjustable spanner in electrical tape or use a thin microfibre cloth between the tool and the tap. This prevents the metal jaws from leaving permanent scratches or teeth marks on your polished bathroom or kitchen hardware.
The Essential DIY Plumbing Toolkit
You don't need a van full of equipment, but having the correct specific tools is non-negotiable. An adjustable spanner with a wide jaw is your primary tool for loosening the tap valve. You will also need a set of screwdrivers; a flat-head is useful for prying off decorative indices, whilst a cross-head (Phillips) is typically required for the internal retaining screw. Because London and Kent are notorious hard water areas, keep a bottle of limescale remover and an old toothbrush nearby. Cleaning the internal threads and the tap seat before reassembly ensures a much tighter, more reliable seal. If you find the internal components are beyond cleaning, you may need to source a specific ceramic cartridge or a set of rubber O-rings from a local merchant in Dartford or across Kent before proceeding.
How to Isolate Your Water Supply
Safety is paramount when dealing with pressurised plumbing systems. You must locate your internal stopcock to cut off the water supply before dismantling any part of the tap. In most properties across London and Kent, this is found under the kitchen sink, though it can sometimes be located in a hallway cupboard or beneath the floorboards near the front door. Turn the handle clockwise until it is tight. If your plumbing has been recently updated, you might find individual isolation valves on the copper pipes directly beneath the basin. These can be turned 90 degrees with a flat-head screwdriver to stop the flow. After isolating the supply, open the tap fully. This drains any remaining liquid from the pipes and confirms that the water is truly off. If you discover your stopcock is seized or you cannot find an isolation point, it's best to request professional plumbing repairs rather than risking a high-pressure leak.
Step-by-Step Guide: How to Fix a Dripping Tap
Understanding how to fix a dripping tap involves a methodical approach to dismantling the internal housing. Once you have isolated the water and protected your basin as described previously, start by removing the decorative indices. These are the small "H" or "C" caps on top of the handles. On many designer monobloc taps common in newer London developments, you may need to look for a tiny grub screw hidden at the back of the lever, which often requires a small Allen key to loosen. After removing the cap, undo the central retaining screw and lift the handle or lever away from the tap body.
With the internal valve now visible, use your adjustable spanner to unscrew the cartridge or headgear nut. If the valve feels seized due to the heavy limescale common in Kent and Dartford, apply steady, firm pressure rather than sudden jerks to avoid damaging the pipework behind the wall. Once the component is removed, replace the faulty parts and reassemble the fixture by following these steps in the exact reverse order. Ensure everything is snug, but avoid using excessive force which could strip the threads.
Fixing Traditional Compression Taps
Traditional taps rely on a simple rubber washer to create a watertight seal. Once the valve is removed, you'll see a small brass nut at the base; unscrew this to release the old, perished washer and slide a new one into place. Before reassembling, inspect the internal metal surface for any signs of pitting or erosion. The tap seat is the metal surface the washer presses against. If this surface is uneven, a new washer won't stop the leak, and you may need a seat-grinding tool or a professional new tap installation to resolve the issue permanently.
Fixing Modern Ceramic Disc Taps
Modern mixer taps use ceramic cartridges which, whilst durable, cannot be easily repaired and usually require a full replacement. Because there are hundreds of different cartridge sizes used across London homes, it's best to take the old unit to a local merchant in Dartford or Kent to ensure a perfect match. When installing the new cartridge, look for the small plastic lugs on the base; these must align perfectly with the corresponding holes in the tap body. Tighten the cartridge until it is hand-tight, then give it a very slight nudge with the spanner. You should never over-tighten a ceramic cartridge, as this can crack the delicate internal discs and cause an immediate leak.
Beyond the Washer: Solving O-Ring Leaks and Spout Issues
If you have followed the previous steps and the tap is still leaking from the base of the spout rather than the end, you aren't looking at a failed washer. This specific type of leak indicates that the O-rings, the small rubber circles that seal the swivel spout to the tap body, have perished. Learning how to fix a dripping tap often requires looking deeper into the spout assembly itself, especially in regions like London and Kent where hard water is prevalent. The high mineral content in the local supply causes rubber components to become brittle and lose their elasticity much faster than in soft water areas. When these rings fail, water escapes under pressure every time the tap is turned on, eventually pooling around the base of your fixtures and potentially damaging your worktops.
Replacing Spout O-Rings
To access these hidden seals, you must first remove the spout. Most modern kitchen mixers have a small grub screw or a threaded collar at the back of the spout base. Once loosened, you can gently lift the spout upwards with a slight twisting motion. You will see two or three rubber O-rings seated in grooves on the internal manifold. Use a small flat-head screwdriver to pry off the old, brittle rings, taking care not to scratch the brass body. Before sliding the new rings into place, apply a thin layer of plumber's silicone grease. This simple addition ensures a watertight seal and allows the spout to swivel smoothly without wearing down the new rubber. If the spout is seized or the O-rings have fused to the body, our team provides expert plumbing repairs to prevent permanent damage to your fixtures.
Dealing with Limescale Build-up
Limescale is the primary enemy of plumbing systems in Dartford and across the South East. Whilst the spout is removed, you will likely see white, crusty mineral deposits encrusted amongst the internal threads and O-ring grooves. A 'clean' tap valve lasts significantly longer than one encrusted with minerals, as grit acts like sandpaper against the rubber seals. Soak the removed spout in white vinegar or a professional descaler for thirty minutes to dissolve these deposits. You can also use an old toothbrush to scrub the internal tap body. As a preventative measure, regularly moving your swivel spout and handles to their full range of motion helps prevent minerals from seizing the components in place. This small habit can save you from a costly emergency call-out in the future.
When to Call a Professional Plumber in Dartford or Kent
Whilst many homeowners in postcodes like DA1 and BR1 successfully learn how to fix a dripping tap, there is a gentle point of no return where a DIY approach reaches its limit. If you discover that the tap seat is heavily pitted or the internal brass body is corroded, a simple washer replacement will not suffice. In these instances, the metal itself has worn away, and continuing to apply force could lead to a fracture in your pipework. For residents in older Kent properties, recognising this boundary is essential for maintaining the long-term integrity of your home's fixtures.
There are also technical complexities involved with modern systems, such as unvented hot water cylinders or high-pressure mixers common in SE1 developments. Beyond plumbing, your property might require a more holistic touch to address the wear and tear of daily life. Integrating various trade skills ensures that a minor repair doesn't lead to a larger maintenance failure. Whether your home needs a fresh coat of paint, bespoke carpentry, or a gas safety check, choosing a professional solution provides the security that every repair is permanent and compliant with modern standards.
Signs You Need a Professional Intervention
The tap valve is seized due to heavy limescale and will not budge even with steady, firm pressure.
Water is leaking from the pipes beneath the sink or from a junction behind the wall, suggesting a wider system failure.
You have a modern, high-tech fixture, such as a boiling water or sensor tap, that requires specialist manufacturer parts and diagnostic tools.
How Our Team Supports Your Home
We are a trusted plumbing & heating company providing reliable, high-quality services across London and Kent. Our expertise extends far beyond plumbing repairs; we offer a comprehensive range of trade services including gas engineering, carpentry, painting, and general property repairs. Since 1996, we have been a steady hand for homeowners in Dartford and surrounding areas, offering transparent billing and the expertise of Gas Safe Registered engineers. Whether you have started the process of how to fix a dripping tap and found the task complex, or you require a full new tap installation, we provide the approachable and professional support needed to keep your property in peak condition.
Restore Peace and Efficiency to Your Home
Taking the time to resolve a leak is a wonderful first step in caring for your property. You now understand the essentials of how to fix a dripping tap, from the initial isolation of the supply to the delicate replacement of internal seals. Whilst we hope this guide empowers you to handle minor repairs, we also recognise that maintaining a home often involves a broader scope of work that goes beyond a simple spanner and washer.
We are a trusted plumbing & heating company providing reliable, high-quality services across London and Kent, including postcodes like DA1, SE1, and BR1. Our team takes a gentle, expert approach to all aspects of home care, offering not just plumbing and gas safety, but also professional carpentry, painting, and general property repairs. Whether you are in the heart of Dartford or a nearby Kent village, we aim to be your dependable partner for every maintenance project. Should you decide that a professional touch is needed to ensure a perfect finish, please book a repair or property assessment today. We are here to ensure your home remains a comfortable, well-maintained sanctuary for years to come.
Frequently Asked Questions
How do I know if I need a new washer or a new cartridge?
Check the movement of your tap handle. Traditional taps that require several full rotations to open usually contain rubber washers. If your tap only needs a quarter or half-turn to reach full flow, it uses a ceramic cartridge. Identifying this correctly is the first step in learning how to fix a dripping tap, as the internal components are not interchangeable and require different repair techniques.
Can a dripping tap cause a high water bill in London?
Yes, a persistent leak can waste over 5,000 litres of water every year. For London residents on a water meter, this waste shows up directly on your monthly bill. Repairing a drip is one of the most effective ways to reduce utility costs whilst protecting the local environment from unnecessary water loss.
Is it possible to fix a tap without turning off the water?
No, you must never attempt to dismantle a tap whilst the water supply is live. The internal components are under constant pressure; removing the valve without isolating the supply will result in an immediate and forceful flood. Always locate your internal stopcock or under-sink isolation valves before you begin any repair procedure.
Why is my tap still dripping after I changed the washer?
This usually indicates that the tap seat is damaged or pitted. The seat is the metal surface the washer presses against to stop the water flow. If this surface is uneven due to age or corrosion, a new washer won't create a watertight seal. In these cases, a professional new tap installation is often the most reliable way to stop the leak permanently.
How much does it typically cost to have a tap professionally fixed in Kent?
Professional plumbers in Kent and Dartford typically base their charges on the complexity of the repair and the cost of replacement parts. We are a trusted plumbing & heating company providing reliable, high-quality services across London and Kent. We provide honest billing for all plumbing repairs, ensuring you receive a clear assessment before any work begins on your property.
What is the difference between a compression tap and a ceramic disc tap?
Compression taps use a screw-down mechanism to squash a rubber washer against a metal seat. Ceramic disc taps use two highly polished plates that slide over each other to block or allow water flow. Ceramic discs are generally more durable but are more sensitive to the grit and limescale frequently found in the London water supply.
Can I use WD-40 to loosen a seized tap valve?
You can use a penetrating oil like WD-40 to help loosen a seized headgear nut, provided you are careful. Ensure you clean away any oily residue before installing new rubber washers, as the chemicals can degrade the rubber over time. If the valve remains stuck after a few attempts, don't apply excessive force that might snap the pipework.
Does hard water make taps drip more often?
Yes, the high mineral content in London and Kent's water supply accelerates seal failure. Limescale deposits build up amongst the internal mechanisms, acting like an abrasive that wears down rubber washers and scratches ceramic discs. While regular maintenance helps, you can learn more about Kinetico Belgium to see how professional water softening systems provide a more permanent solution to mineral damage in your home.


Comments